
5 DIY Chair Makeovers Before and After: Paint, Weave, Victorian, Weekend, Director’s
Five before-and-after DIY chair makeovers—paint and upholstery, woven backs, a kid-friendly Victorian, an easy weekend redo, and refreshed director’s chairs.
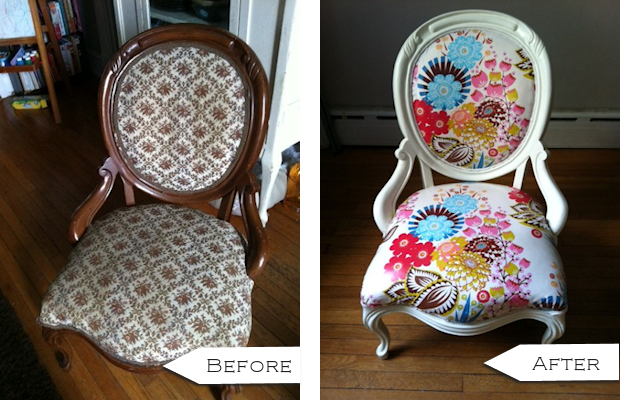
Old chairs fail in familiar ways: tired upholstery, scratched finish, wobbly joints, or a silhouette that no longer matches the room. A DIY makeover can fix all four without buying new furniture. The five before-and-after approaches below cover the jobs people actually face—paint and fabric refresh, woven-back repair, a Victorian piece softened for family use, a simple weekend redo, and director’s chairs rebuilt for outdoor rocking.
None of these projects require a full workshop. They do require honest assessment: if the frame is rotten or the joints cannot be tightened, paint will not save it. Start with solid wood or sturdy plywood frames, then choose the makeover that matches the chair’s problem.
1. Classic paint-and-upholstery refresh
The most common before-and-after chair story is also the most flexible: strip or sand a dated finish, paint the frame a cleaner color, and recover the seat. This is the Style-at-Home-style makeover many DIYers recognize—dining chairs, accent chairs, and thrift finds that look heavy until the finish lightens.
Before you open a paint can, clean the frame with a degreaser and check for rock. Tighten screws, re-glue loose joints, and let repairs cure fully. Sand glossy varnish until the surface feels dull; primer sticks to dull wood and fails on slick factory lacquer. Choose a paint system meant for furniture—hybrid enamel or cabinet paint—so the finish survives scooting and bag straps.
Upholstery can stay simple. Many dining seats are a plywood board wrapped in foam and fabric, stapled underneath. Photograph the underside before you strip staples so you remember how the corners folded. High-density foam keeps the “after” comfortable; thin craft foam compresses in months. Pick fabric for abrasion: cotton canvas, performance linen blends, or vinyl for kids’ seating. Pattern hides stains better than pale solids if the chair lives near a table.
The visual leap in before-and-after photos usually comes from contrast: dark wood becoming soft white or charcoal, floral fabric becoming a graphic stripe. Keep one element familiar—original nailhead trim, curved legs—so the chair still feels like itself, just updated.
2. Woven-back chair makeover
Woven backs—cane, rush, paper cord, or woven webbing—age differently from solid wood. The seat may still be fine while the weave sags, breaks, or yellows. A woven-back makeover focuses on structure you can see through: replacing or tightening the weave, then finishing the frame so the new pattern reads crisp.
If the cane is only dirty, gentle cleaning and a light conditioner may be enough. If strands are broken, plan on a full re-cane or a modern substitute such as Danish cord or cotton webbing. Beginners often prefer webbing or cord because the learning curve is steadier than traditional cane with pegs and spline. Measure the opening carefully; woven materials shrink and settle, so tension matters more than speed.
Paint or stain the frame after the weave is stable, masking the new material so drips do not ruin the pattern. Mid-tone stains show weave texture well; bright white frames make natural cane look graphic. In before-and-after sets, the “after” usually looks lighter and more intentional because the broken grid is gone and the frame color finally agrees with the room.
Protect the finished weave from rear-chair abrasion—keep the chair off radiators and out of direct sun when possible. Woven backs are beautiful and less forgiving than solid plywood; treat them as furniture, not step stools.
3. Victorian chair made kid-friendly
Formal Victorian chairs look precious until a household with children needs seating that can survive snacks and homework. The kid-friendly makeover keeps the ornate frame—carved legs, curved back—while swapping fragile silk or dark velvet for washable, cheerful upholstery and a finish that hides fingerprints.
Before: heavy fabric, maybe tears, maybe a finish that shows every scuff. After: durable textile in a friendly color or small pattern, foam that feels soft enough for long sits, and edges secured so little fingers cannot pick at loose welting. The goal is not to erase history; it is to stop treating the chair like museum glass.
Practical steps: remove the old cover and save buttons or trim if you want a nod to the original style. Use stain-resistant fabric or a washable slipcover approach if you need to launder often. Round off any sharp repaired edges. Consider a slightly thicker seat cushion so the chair invites use instead of warning people away.
Paint can help too. A soft color on the frame—muted blue, warm gray, cream—photographs as a clear before-and-after and signals that the piece now belongs in a lived-in room. Keep original wood showing on a detail if you love the grain; full paint is optional, not mandatory.
This makeover succeeds when adults still admire the silhouette and kids actually sit down. If the frame is unstable, repair first. Pretty fabric on a rickety antique is a hazard, not a craft win.
4. Easy weekend chair makeover
Not every redo needs new cane or custom piping. An easy chair makeover is the thrift-store special: clean, lightly sand, paint, and recover or recover only the seat pad. This is the project for when you have a free Saturday and one tired armchair or side chair that is structurally fine.
Strip hardware and bag the screws. Fill shallow gouges with wood filler, sand smooth, prime, and paint in thin coats. Skip thick gloppy layers; they chip. While paint dries, cut new fabric using the old cover as a pattern—or buy a premade cushion cover if the seat is a standard shape.
Before-and-after impact here comes from color courage. A muddy brown frame becomes sage, ink, or soft terracotta; a stained seat becomes crisp linen. Change one big variable so the transformation reads in photos and in the room. Add felt pads under feet so the “after” does not immediately scratch the floor.
Limit scope on purpose. Easy makeovers fail when people start stripping veneer at 8 p.m. or decide mid-project to rebuild the springs. If springs are shot, either budget a longer project or choose a different chair. The weekend format rewards restraint.
5. Rocking director’s chairs
Director’s chairs are foldable frames with sling seats—camp, patio, and film-set classics. A rocking version (or a pair restyled to feel like outdoor rockers in spirit) swaps tired canvas, refreshes the wood or metal frame, and restores smooth motion. Before: faded sling, sticky hinges, unfinished wood that weathers badly. After: new canvas in a strong color, sealed frame, hardware that folds and unfolds without fighting you.
Replace sling fabric with canvas rated for outdoor use if the chairs live on a porch. Cut carefully from the old pieces, or follow the manufacturer’s replacement pattern if you still have model info. Tension the fabric so sitting does not bottom out, but leave enough give for comfort. For wood frames, sand, seal with exterior spar varnish or exterior paint, and lubricate folding joints lightly.
If you are converting or pairing chairs to create a rocking seating moment, check balance and stop points. Rocking furniture needs clearance behind and a level surface. Do not force a foldable director’s frame into a rocker base unless you understand the joinery—safer to refresh true rocking chairs or buy compatible rocker bases designed for the job. Many inspiring before-and-after galleries show director’s chairs simply reborn with new slings and paint, which is enough for a dramatic patio update.
Style the pair as a set. Matching canvas and frame color makes the after shot look intentional; mismatched thrift finds can share one paint color even if the silhouettes differ slightly.
Choosing your before-and-after path
Match the method to the chair. Solid dining seats love paint and new fabric. Open backs with broken weave need weaving attention. Ornate antiques in family rooms need durable upholstery more than museum silk. Simple thrift chairs need a disciplined weekend plan. Director’s and sling chairs need new textile and weather-ready finish.
Photograph your before clearly—same angle, same light—so the after feels earned. Keep a parts cup for screws. Work outside or on a drop cloth. Ventilate when finishing. Most of all, stop when the chair is strong and useful. A makeover is successful when someone sits without asking whether they are allowed to.
Five chairs, five problems, five readable transformations: refresh, reweave, soften for kids, keep it easy, and revive the director’s sling. Pick one chair this month. The after photo will wait; the seating will not.

Comments
Continue reading
DIY Dollar Store Decoration: Lamps, Vases, Mirrors, Sconces, and Candle Holders
Turn dollar-aisle glass, mirrors, and candle holders into lava-style light jars, enamel vases, a silverware starburst mirror, stone-look sconces, and finished candle bases.
How to Make Mason Jar Candles: Pour, Tint, Hang, and Gift
Clean jars, size the wick, pour wax safely, then branch into coloured glass, hanging lanterns, lavender scents, remelted stubs, floating lights, and favor-ready finishes.
Colorful Paper Lantern DIY: Garlands, Flowers, Geometry, and Chandeliers
Build festive paper lanterns with safe LED lighting—garlands, floral skins, geometric overlays, and clustered chandeliers—using materials and a build order that actually hold up.