
5 DIY Kitchen Organization Ideas That Actually Stick
Five low-cost DIY projects—magnetic spices, under-cabinet jars, measuring charts, under-sink rods, and wire can racks—to reclaim kitchen space.
A kitchen can look clean and still fight you every morning. Spices hide behind half-empty bottles. Measuring spoons tangle in a drawer. Spray bottles tip over under the sink. Cans stack into unstable towers that collapse when you reach for soup. Organization is less about buying more bins and more about giving every frequent item a fixed home that matches how you cook.
These five DIY projects stay low-cost on purpose. They use paint, jars, vinyl or paper charts, a tension rod, and wire racks—materials most homeowners can find without a specialty store trip. None of them requires a full pantry remodel. Each one attacks a real friction point: spices, dry goods at eye level, measuring tools, cleaning supplies, and can storage.
1. Magnetic spice cabinet with magnetic paint
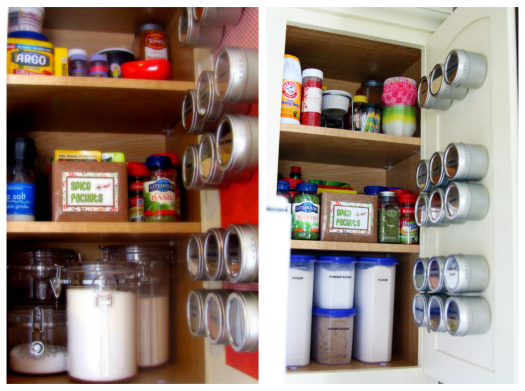
Spice chaos usually starts with deep shelves. You buy paprika twice because the first tin is buried. Magnetic paint on the inside of a cabinet door—or on a side panel—turns unused vertical space into a spice wall. Metal tins stick where you can see labels at a glance.
Prep matters more than brand names. Empty the cabinet. Clean the surface with a degreaser; kitchen film kills adhesion. Sand lightly if the finish is glossy. Apply magnetic paint in the coats the product recommends, letting each layer dry fully. Magnetic paint is not as strong as a steel sheet, so use light tins and test hold before loading every jar. If a heavy glass jar slides, switch that spice to a lighter container or mount a thin steel panel over the painted area for extra grip.
Sort by how you cook, not by alphabet alone. Put everyday spices at the height your hand reaches without stretching. Keep baking spices together, savory blends together, and rarely used items on a higher or lower row. Label lids clearly so you are not twisting every tin open mid-recipe. When a tin empties, refill it rather than buying a duplicate bottle that starts a new pile on the shelf.
This project shines in small kitchens where shelf real estate is scarce. It also works on a pantry door if cabinet doors are glass or too narrow. Budget is mostly paint plus matching tins if your current bottles are plastic. An afternoon of painting and a quiet evening of filling tins is enough for most households.
2. Under-cabinet mason jar storage
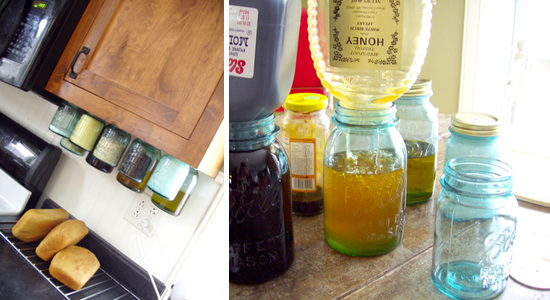
When upper cabinets are full, the underside of those cabinets is often wasted. Mason jars mounted under a cabinet put dry goods, utensils, or craft-kitchen supplies in clear view without eating shelf space. The classic approach uses jar lids screwed to the cabinet bottom so jars twist on and off for refill.
Measure before you drill. Mark lid positions so jars clear the counter edge, do not block outlets, and leave room for your tallest appliance if you keep a mixer or toaster nearby. Use screws appropriate for the cabinet material—particleboard needs care so fasteners do not strip. If you rent and cannot drill, look for heavy-duty adhesive mounts rated for the jar weight, and still keep contents light.
Choose contents that match the location. Flour and sugar work if you cook often and wipe rims so lids seal cleanly. Pasta, oats, dried beans, and baking chips also suit clear jars. Avoid storing oils or anything that goes rancid in warm under-cabinet heat near lights. For utensil versions, shorter jars holding spatulas or whisks keep the counter freer without a full utensil crock.
Keep the look intentional. Matching jar sizes read as a system; random heights look like clutter hanging overhead. Wipe jars when sticky residue builds up. If a lid loosens over time, retighten screws rather than ignoring a wobbly jar above a work zone.
This idea pairs well with the spice project: spices on the door, everyday dry goods under the cabinet, shelves reserved for bulk and overflow. Together they reclaim vertical space without buying another freestanding rack.
3. Measuring tools plus a conversion chart on the door
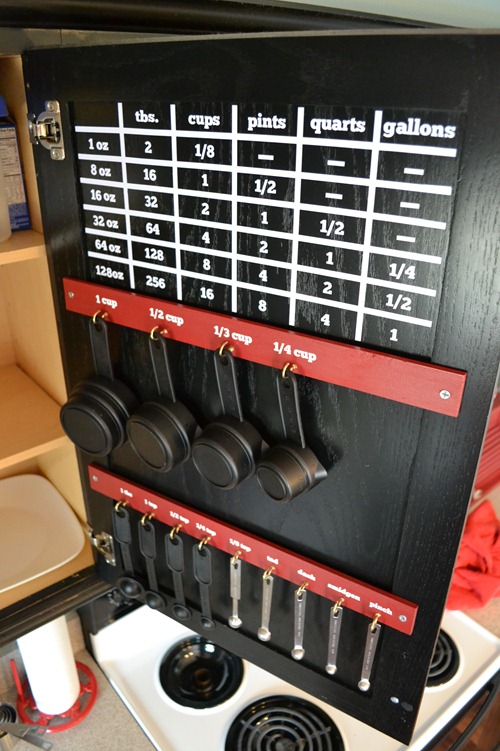
Measuring cups and spoons fail organization in two ways: they tangle, and you still open a phone for cup-to-tablespoon conversions while flour is already on the counter. Dedicate one shallow drawer or a hanging rack for measuring tools, then put a conversion chart on the inside of the nearest cabinet door.
Vinyl lettering or a printed chart sealed under clear contact paper both work. Measure the door panel so the chart sits above shelf edges and does not rub when the door closes. Keep the type large enough to read without leaning in. Include the conversions you actually use: cups to tablespoons, tablespoons to teaspoons, ounces to cups for liquids, and a few metric notes if your recipes switch systems.
Hang cups and spoons on small hooks, a slim rail, or nest them in a narrow tray so nested sets stay nested. Separate liquid and dry cups if your set allows it—using a dry cup for oil and never wiping it is how sticky drawers start. If hooks go on the door, confirm the door still closes without hitting shelves or neighboring doors.
The payoff is speed. Mid-recipe, you glance at the door instead of scrolling. Guests who help bake stop asking where the quarter-cup went. Children learning to cook get a visual reference that stays put. Refresh the chart when it yellows or peels; a faded chart becomes wallpaper you ignore.
4. Under-sink tension rod for spray bottles
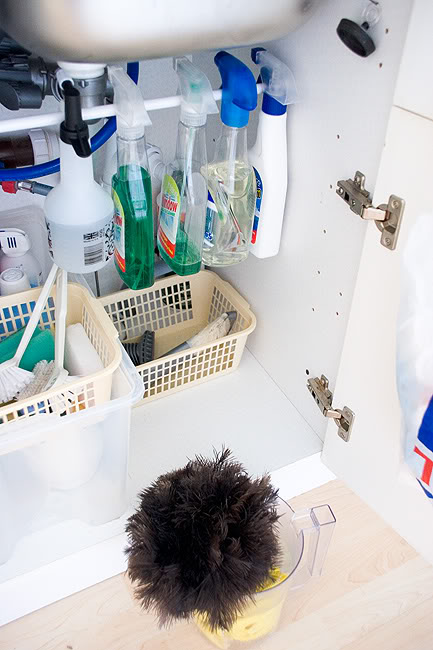
The cabinet under the sink collects bottles, sponges, and mystery bags until the plumbing is hard to reach. A tension rod installed high across the cabinet lets you hang spray bottles by their triggers. Bottles hang in a row; the floor of the cabinet opens for bins, dishwasher pods, or a small trash pull-out.
Choose a rod that fits the cabinet width firmly. Install it high enough that hanging bottles clear the floor and do not bang against the drain or shutoff valves. Do not force pressure against fragile particleboard sides—if the cabinet walls flex, use a shorter rod with end caps designed for hollow walls, or mount a simple rail with screws into solid framing when that is an option. Keep chemicals labeled and upright; hanging works for bottles with sturdy trigger necks, not for every container shape.
Group by job: everyday cleaners toward the front, specialty products toward the back or in a bin below. Wipe drips so the rod and cabinet floor stay dry. If a bottle leaks, fix or replace it rather than letting residue eat finishes. Keep anything hazardous away from kids’ reach and out of food storage zones; under-sink organization should not become an invitation for curious hands.
This project often takes under thirty minutes and costs less than a specialty under-sink carousel. It also makes leak checks easier because pipes are no longer buried behind a forest of bottles.
5. Wire closet racks inside kitchen cabinets
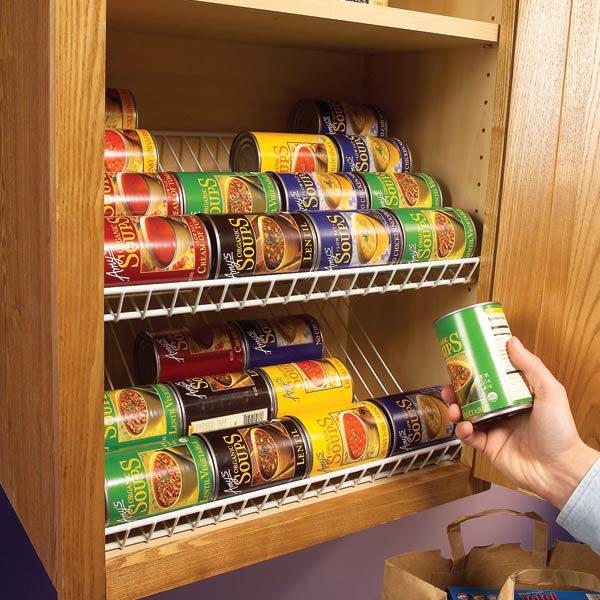
Wire closet shelving is usually sold for bedrooms, but short sections mounted at an angle inside a pantry or base cabinet create can dispensers and tiered storage. Cans roll forward as you remove one from the front. Boxes stand in rows instead of hiding behind each other. The open wire lets you see stock levels without unloading half the shelf.
Measure the cabinet depth and width. Cut or order rack sections that leave clearance for the door and hinges. Mount with the hardware the rack system expects, into solid cabinet sides when possible. Angle the rack gently so cans move without launching; too steep and labels face the wrong way or cans jam. Test with empty cans before loading a full week of groceries.
Use this system for soup, vegetables, beans, and other uniform cans. Odd-shaped jars may need a flat shelf instead. Label the front edge of each row if multiple can types share a rack. Rotate stock: new cans go in back or top so older dates leave first. Wipe sticky rings so cans do not glue themselves in place.
If a full closet-system install feels like overkill, start with one cabinet that always frustrates you—usually the deep pantry shelf where cans vanish. Success there justifies expanding. The point is visibility and first-in, first-out flow, not filling every cabinet with wire for the sake of looking industrial.
Putting the five ideas to work
Do not attempt all five on the same Saturday unless you enjoy unfinished paint projects and a dismantled kitchen. Pick the friction that costs you the most time: missing spices, buried cans, or the under-sink avalanche. Finish that system, live with it a week, then add the next.
Before you buy materials, empty and wipe the zone you will improve. Discard expired food and duplicate cleaners. Organization projects fail when they rearrange trash into prettier piles. Measure twice so rods, jars, and racks actually fit. Keep pathways for plumbing access and for doors to swing freely.
These five DIY kitchen organization ideas stay true to a simple promise: low-cost projects that make daily cooking less of a scavenger hunt. Magnetic spices, hanging mason jars, measuring tools with a door chart, a tension-rod cleaner row, and wire-rack can storage each reclaim space you already own. When the kitchen stops hiding what you need, dinner starts sooner—and that is the kind of upgrade you notice every single day.

Comments
Continue reading
Kitchen Design Ideas: Layout, Storage, Light, and Finishes That Work
Practical kitchen design ideas—work zones, cabinetry, lighting, and durable finishes—so inspiration translates into rooms that cook and gather well.
DIY Dollar Store Decoration: Lamps, Vases, Mirrors, Sconces, and Candle Holders
Turn dollar-aisle glass, mirrors, and candle holders into lava-style light jars, enamel vases, a silverware starburst mirror, stone-look sconces, and finished candle bases.
How to Make Mason Jar Candles: Pour, Tint, Hang, and Gift
Clean jars, size the wick, pour wax safely, then branch into coloured glass, hanging lanterns, lavender scents, remelted stubs, floating lights, and favor-ready finishes.