
DIY Summer Sandals and Flip-Flops You Can Actually Wear
Upgrade basic flip-flops with fabric wraps, gladiator laces, macrame, fringe, and beads—plus fit checks and glue tips so handmade sandals last.
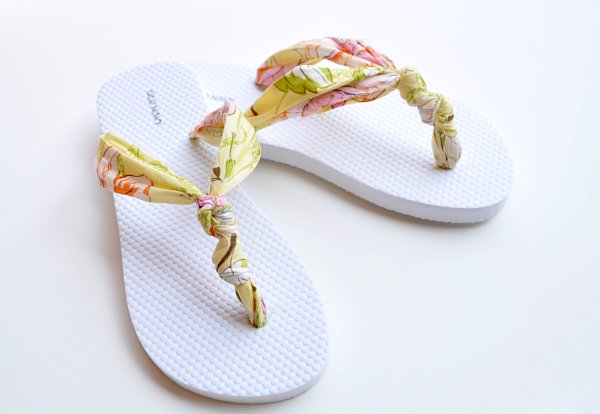
Flip-flops and flat sandals are summer’s easiest canvas: cheap base pairs, open toes, and enough strap real estate for fabric, fringe, beads, or simple stitching. Designing your own pair is less about couture footwear and more about personalizing something you will actually wear to the market, the beach path, or a backyard party. This guide walks through practical DIY sandal and flip-flop upgrades—materials, methods, fit checks, and durability—so your project survives more than one sunny afternoon.
Use the photo as a reminder of the goal: playful color, handmade texture, and a shoe that still functions as a shoe.
Start with the right base pair
Not every drugstore flip-flop is worth decorating. Choose:
- Firm soles that do not fold in half when you twist them
- Straps with some width if you plan to wrap fabric or glue embellishments
- A fit you already like—DIY will not fix a thong that blisters between the toes
- A clean surface (wipe with isopropyl alcohol before glue)
For gladiator-style wrap sandals, a simple flip-flop or slide with a secure toe post or vamp gives you anchor points. For macrame or leather fringe, thicker straps hold knots and stitching better than paper-thin jelly shoes.
Tools and materials that actually help
- Fabric scraps, bias tape, or wide ribbon
- Hot glue gun and fabric glue (and patience for dry time)
- Sharp scissors, lighter for sealing synthetic ribbon ends
- Needle, strong thread, or a leather needle for thicker materials
- Optional: suede fringe, wooden beads, metallic studs, embroidery floss, thin leather cord
- Painter’s tape for marking wrap patterns before you commit
Skip anything sharp that will press into the top of your foot—spike studs belong on the outer strap face, not the underside that rubs skin.
Project 1: Fabric-wrapped flip-flops
This is the classic beginner upgrade and a good use for leftover quilting cotton or jersey.
- Cut strips long enough to spiral around each strap with a slight overlap. Jersey stretches and forgives; woven cotton looks crisper but needs neater ends.
- Anchor the first end on the underside of the strap with a dab of glue where it will not touch skin.
- Wrap tightly toward the toe post, keeping the fabric smooth. At the post, figure-eight carefully so both sides stay even.
- Finish under the strap again; trim and seal.
- Optional: add a small fabric flower or bow at the outer strap, not where it will grind against the other foot.
Walk around the house for ten minutes before you declare victory. Hot spots mean you need to adjust bulk or move a glue blob.
Project 2: Gladiator wrap sandals
Long cords or fabric strips that lace up the ankle turn basic flips into festival-ready wraps.
- Choose soft cord or jersey strips that will not saw into skin.
- Secure one end near the sole edge or existing strap with a hidden knot/glue point.
- Crisscross up the foot and ankle; mark your preferred height with tape while standing.
- Finish with a tie you can undo—permanent knots are a trap when your feet swell in heat.
- Practice putting them on twice so you know the wrap pattern before you leave the house.
These shine for photos and evening walks. They are less ideal for long museum days unless the cord is wide and soft.
Project 3: Simple macrame strap covers
Macrame can cover a plain strap with square knots or spiral knots in cotton cord.
- Measure cord generously—macrame eats length.
- Mount cords at the strap base and work upward in even tension.
- Keep the inner surface as flat as possible; bulky knots belong on top.
- Seal cord ends with a small stitch or clear glue so they do not unravel in water.
Start with one color. Multi-color patterns look great in tutorials and chaotic on a first attempt.
Project 4: Leather or faux-leather fringe
Fringe sandals read bohemian and photograph well, but fringe fails when it is glued only at a few points.
- Cut even fringe strips from a rectangle, leaving a solid band at the top to stitch or glue.
- Attach the solid band along the outer strap edge with strong glue plus a few stitches if the material allows.
- Keep fringe length above the ground—dragging fringe shreds immediately.
- Condition real leather lightly; wipe faux leather clean so adhesives bond.
Test a sit-walk-sit cycle. Fringe that flips under the foot will trip you and peel off.
Project 5: Bead and embroidery accents
For smaller upgrades, embroider a short motif on a wide fabric wrap, or stitch a line of wooden beads onto a secondary ribbon layered over the strap. Keep weight low near the toe post; heavy embellishment there changes how the sandal flexes and can tear cheap foam.
If you use metal studs, set them with the proper tool and cover sharp backs with a drop of glue and a tiny leather patch so nothing scrapes your foot.
Fit, comfort, and safety checks
- No glue on skin paths. Anything that can soften in heat and transfer is a blister risk.
- Flex test. Bend the shoe as your foot would; decorations should flex with the sole or sit on non-bending zones.
- Water plan. Beach sandals will get wet. Prefer synthetic ribbon and waterproof glue, or accept that cotton wraps are for dry days.
- Driving. Thick wraps and high gladiator ties can interfere with pedals. Keep a plain pair in the car.
- Kids’ pairs. Avoid small beads that can detach and become choking hazards.
Color and style recipes
Pick a lane so the shoes look intentional:
- Coastal: white base, navy wraps, natural wood beads
- Garden party: soft florals on neutral flips, tiny bow at the side
- Desert evening: tan faux leather fringe, thin metal accents
- Bright market day: one saturated color wrap, no extra charms
Matching your bag or manicure is optional. Matching left and right shoes is not—build them as a pair, switching feet every few steps of the process so they stay twins.
Durability: making DIY last past week one
Most failures are adhesion failures. Clean the strap, roughen slick plastic lightly with fine sandpaper, and use the glue recommended for that material. Let adhesives cure fully before wearing—overnight is better than “mostly dry.” Reinforce stress points (near the toe post and where wraps begin) with a stitch when possible.
Store decorated sandals away from direct sun when you are not wearing them. Dashboard heat melts glue dreams.
A simple weekend plan
- Friday night: choose base shoes, wash feet-trial them, gather scraps.
- Saturday morning: wrap or knot the first shoe completely.
- Saturday afternoon: mirror the second shoe, then walk indoors for twenty minutes.
- Sunday: fix hot spots, trim threads, take them outside on a short errand.
If a design annoys you during the errand, change it before you invest in beads and fringe. Comfort is the style.
When both sandals feel good at a normal walking pace and still look like a matched pair from a few feet away, stop adding things. The splash is in a clean idea worn confidently—not in every craft drawer emptied onto a thong strap.

Comments
Continue reading
DIY Summer Dresses You Can Sew on a Budget
Maxi conversions, tank-top bodices, sheet wraps, and low-seam knits—practical ways to sew cool weather dresses from what you already have.
DIY Shorts Redesigns You Can Finish at Home
Turn old shorts into dip-dye, print, lace, bleach, scallop, and no-sew refashions with practical steps, fabric tips, and a weekend plan—no affiliate hard sell.
Easy Cheap Mason Jar DIY: Luminaries, Terrariums, Lamps, Dispensers, and Vases
Repurpose mason jars into luminaries, terrariums, drink cups, lamps, ornaments, soap dispensers, herb planters, and vases with simple, low-cost steps.