
Christmas Candy Cane Crafts: Sleds, Candles, Pots, and Reindeer
Five peppermint craft projects—crushed mint toppings, candy sleds, potted canes, candle wraps, and burlap reindeer ornaments—with practical glue and storage tips.
A single candy cane was once a precious holiday treat—twisted by hand, wrapped carefully, and saved for children who understood it as something special. Today the canes arrive by the bag: striped, flavoured, oversized, mini, even rainbow. The mint crunch is still Christmas shorthand. What changes is what you do with them after the first few disappear from the bowl.
Candy canes are edible decoration. They hang on trees, stir cocoa, and survive the season in craft drawers as reliably as ribbon. The projects below treat them as both material and motif—crushed for kitchen toppings, glued into sleds and candle wraps, planted in faux pots, and dressed as reindeer ornaments. None require a craft studio. Most need only glue, ribbon, and the patience to let sugar dry before you move it.
A short history that still helps the crafts
Holiday lore often says straight peppermint sticks were given to children to keep them quiet during Christmas services, and that a candy maker later bent them into a shepherd’s crook. Whether every detail of that story is documentary history or seasonal myth, the hook shape is what makes candy canes craftable. The curve is a handle, a ski, an antler, a hanger. Straight mint sticks are useful for crushing; hooked canes are useful for building.
Buy extras specifically for crafting. Fresh canes snap cleaner and glue more evenly than soft, sticky leftovers from last December. Mini canes suit sleds and cocoa toppings; standard six-inch canes suit candles and reindeer; jumbo canes look dramatic in pots but are heavier and need stronger adhesive.
1. Crushed mint for drinks and desserts
Start with the kitchen project that wastes nothing. Slip a few small canes into a sturdy sandwich bag, press out excess air, and crush them with a rolling pin or the bottom of a mug. Aim for a mix of powder and small chips rather than dust alone—powder dissolves into flavour; chips give texture and colour.
Use the crush as a float on hot chocolate, a rim for peppermint cocoa or milkshakes, a garnish on fudge or brownies, or a topping for vanilla ice cream and cheesecake. Stir a spoonful into whipped cream for a quick peppermint cloud. Store leftovers in a jar with a tight lid; humidity turns mint powder into a sticky brick.
If you are crafting with children, crushing is the safest “first station.” No open flames, no hot glue, and everyone gets an immediate snack reward. Keep a second bag of whole canes for the structural projects so you do not eat the building materials.
2. Candy sleds for place settings and party favours
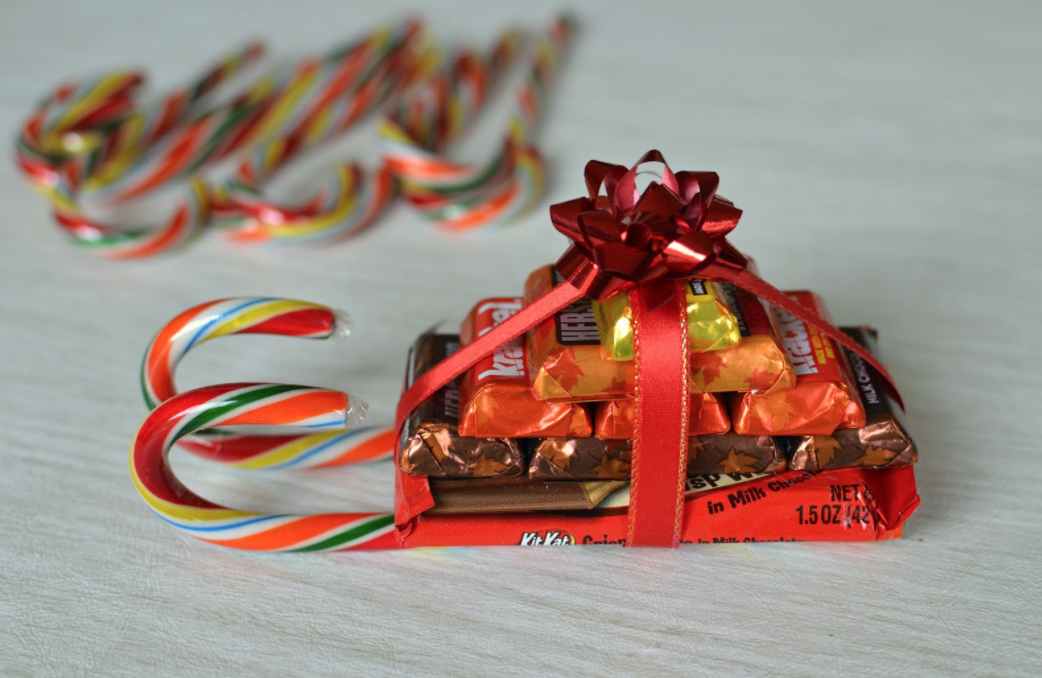
Candy sleds are the classic edible favour: two short canes as runners, a flat chocolate bar as a sled bed, and a stack of miniature wrapped bars as the “gift load.” Use canes about three inches long if you can find them, or carefully snap longer canes to size and keep the hooked ends as decorative fronts.
Glue one cane to each long side of a standard flat candy bar so the hooks face forward like sled runners. Let the glue set, then stack mini bars on top and glue them into a small pile. Finish with a tiny bow. Guests can pull the stack apart later; until then, the piece looks like a loaded Santa sled beside a plate or tucked into a stocking.
Food-safe craft glue or melted candy melts work when the favour will be eaten soon. Hot glue is stronger for display-only sleds you do not intend anyone to unwrap and consume. Label the difference if children are involved—nobody wants a surprise of craft adhesive with their chocolate.
Make a batch in an assembly line: runners first, then beds, then stacks, then bows. They dry while you work the next unit, and a dozen favours appear faster than one fussy centrepiece.
3. Potted canes as table décor
A six-inch terracotta pot becomes a tiny peppermint “plant” with almost no skill. Fill the pot with shredded paper or tissue until you have a firm base, then top with about half an inch of crushed dark cookies—Oreo crumbs read as soil from a dinner-table distance. Stand three or four five-inch candy canes back to back so their hooks flare like a blossom or crown.
Wrap a holiday ribbon around the pot and another around the cane cluster to hold the stems together. The effect is playful rather than realistic, which is the point: it signals Christmas without competing with flowers or greenery. Cluster three pots down a table runner, or give single pots as teacher and neighbour gifts with a card tucked under the ribbon.
If you need the arrangement to travel, push a disc of floral foam into the pot beneath the paper so the canes cannot tip. Keep the pots away from radiators and sunny windowsills; warmth softens the candy and collapses the “stem.”
4. Candy cane candle wraps
A plain pillar candle becomes a centrepiece when ringed with upright canes. Choose a candle about five inches tall and canes roughly six inches long so the hooks rise just above the wax. Working on a protected surface, glue the flat side of each cane to the candle, bottoms aligned with the candle base and hooks curving outward toward you. A dab of glue on the side of each cane helps the next one nest tightly.
Continue until the candle is fully surrounded, then wrap a ribbon around the middle and tie a bow. Peppermint-, pine-, or cinnamon-scented candles add aroma; unscented candles are better if the table already includes strong food smells. Never leave a lit candle unattended, and never let the flame sit so low that it melts into the candy ring—treat the wrap as décor for an LED pillar if you want worry-free glow through a long dinner.
This project scales beautifully for mantels: make three candles in graduated heights and stagger them among greenery. The red-and-white rhythm reads festive from across a room even before anyone smells mint.
5. Burlap candy cane reindeer
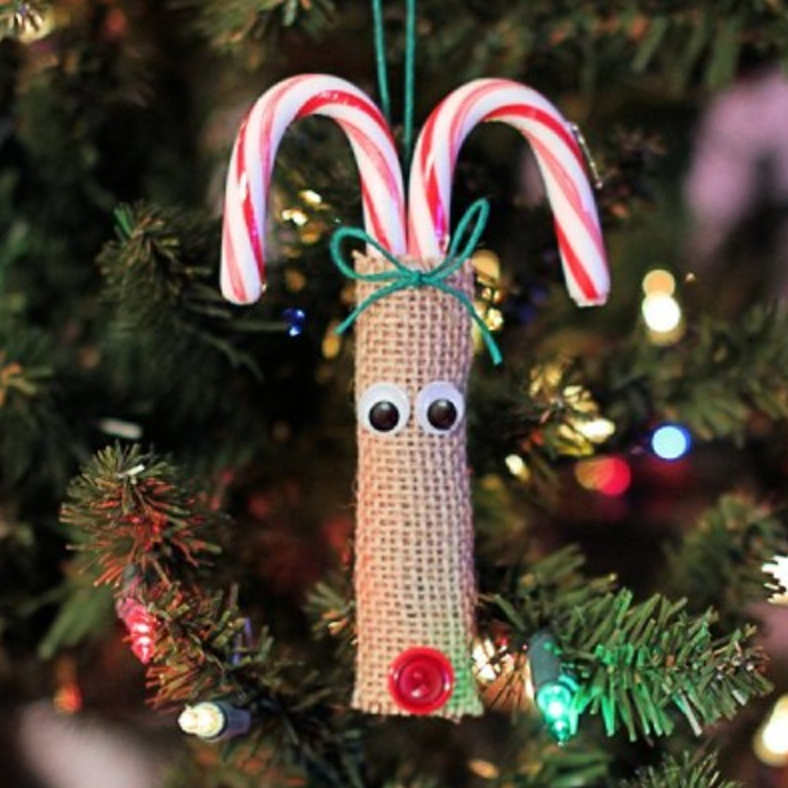
For an ornament children can help assemble, glue two six-inch canes back to back with the curves pointing outward as antlers. Wrap the joined canes snugly in a square of burlap about four and a half inches on each side, gluing the seam firmly on the reverse. Add two googly eyes about two-thirds of the way up the fabric face, then stack two red buttons—larger first, smaller on top—for a Rudolph nose near the bottom.
Tie green baker’s twine just below the top of the burlap to cinch a “collar,” leaving a loop long enough to hang on a branch. The candy remains visible as antlers while the burlap softens the sugar into something that looks handmade rather than store-bought. Make a herd in an afternoon and hang them at different heights; the antler curves catch tree lights especially well.
Supplies are forgiving. If burlap frays, fold a clean edge under before gluing. If buttons feel too heavy, use a red pom-pom. If you want a keepsake that lasts beyond sticky fingers, swap real canes for plastic craft canes after the kids have practiced the design once with the edible version.
Workshop habits that keep sugar crafts sane
- Work on parchment or a silicone mat; dried glue and mint dust clean up faster
- Sort canes by size before you start so runners, pots, and antlers do not compete for the same bag
- Use hot glue for display pieces; reserve food-safe adhesives when people will eat the build
- Let every join cool or cure before you move the piece—candy shifts while glue is soft
- Store finished crafts in a cool, dry place; humidity is the enemy of both ribbons and mint
If you only make one thing this year, choose the project that matches your holiday rhythm. Hosting a dinner? Wrap a candle. Need place favours by Friday? Run a sled assembly line. Crafting with kids on a rainy afternoon? Crush mint first, then build reindeer while cocoa cools. The candy already tastes like December; the craft is just a way to let it hang around a little longer before it disappears.

Comments
Continue reading
Funny Animal Signs That Warn People (While Animals Ignore Them)
From a seagull on a no-birds disc to classic zoo and park ironies—why animal warning signs get funny, and what the rules are still for.
How to Find Local Amenities on Vacation: Mechanics, Haircuts & More
Locate trustworthy local services and everyday spots while traveling or settling in—using publications, reviews, map apps, neighbor tips, and low-pressure exploration.

Kristen Stewart for V Magazine, Spring Preview 2013
V81’s Wild at Heart cover story—Kristen Stewart shot by Inez & Vinoodh, styled by Joe McKenna, in pale minimal spring glamour.