
9 DIY Picnic Blanket Projects for Parks, Patios, and Beaches
Oilcloth classics, sunburst piecing, patchwork, roll-up straps, geometry, vintage tablecloths, and date-night sizes—nine DIY picnic blankets you can sew (or nearly sew) yourself.
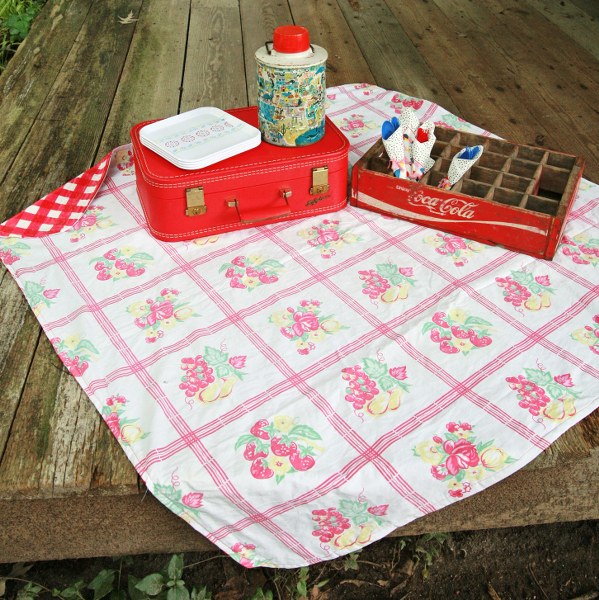
Summer picnic season is really a textiles problem: you need something large enough for food and people, tough enough for grass, and pleasant enough that you do not mind carrying it home dusty. Store-bought blankets work, but a DIY picnic blanket lets you choose size, waterproofing, and color. The nine projects below turn oilcloth, canvas, vintage tablecloths, and scrap fabric into outdoor seating you will actually pack.
Keep the photo as a color and scale reference. Skip the old outbound tutorial links; each idea includes enough method to start with a sewing machine (or, in a few cases, strong fabric glue and careful handwork).
1. Classic oilcloth picnic blanket
Pair a soft top fabric—cotton, linen blend, or light canvas—with a wipeable oilcloth or laminated cotton underside. Cut both layers to the same rectangle, typically around 60×70 inches for two people or larger if you host often. Place right sides together if your oilcloth has a print you want facing out on the ground side, or stack wrong sides together if you prefer a bound-edge finish.
Sew around the perimeter with a half-inch seam, leave a gap, turn, press carefully on the fabric side only (oilcloth hates high heat), and topstitch closed. Add optional corner loops of twill tape for staking on windy days. The result is a blanket that shrugs off spilled lemonade and damp lawn better than a plain throw.
2. Sunburst picnic blanket
A sunburst design starts with a square or round top pieced from wedge-shaped strips that radiate from a center point. Draft wedges on paper first so angles add up cleanly—think pie slices in two alternating colors. Sew wedges into a full circle or square panel, press seams open, then apply the panel to a sturdy backing such as canvas or oilcloth.
Keep the motif large; tiny wedges disappear outdoors. Contrast binding around the edge frames the burst and protects raw edges. This project rewards careful cutting more than fancy stitches. Lay the finished top flat on a clean floor before you commit to the backing so the center sits true.
3. Patchwork beach-and-picnic quilt
Patchwork picnic blankets are forgiving because imperfect seams read as charm on a lawn. Cut squares or rectangles from leftover quilting cottons, sew them into rows, then join the rows. Aim for a finished top at least the size of a twin throw. Back with water-resistant fabric or a second layer of cotton plus a thin batting if you want cushion without bulk.
Quilt lightly in a grid or stitch-in-the-ditch so layers stay put in the wash. Bind with bias tape in a bold color that can survive grass stains visually. For beach use, prioritize a wipeable back and leave batting thin so sand shakes out more easily.
4. Portable roll-up picnic blanket
Portability is a design feature, not an afterthought. Make a rectangle of outdoor fabric with a waterproof back, then sew a fabric strap or ribbon pair near one short edge. When you roll the blanket from the opposite end, the straps wrap the bundle and buckle or tie. Some makers add a handle of webbing so the roll carries like a yoga mat.
Keep hardware plastic or coated metal so dew does not rust onto the fabric. Test the roll with a sweater inside before you sew strap placement—too far from the edge and the roll loosens; too close and it will not cinch. This style suits park hops and festival days when you refuse to drag a basket for seating alone.
5. Scrap-friendly patchwork picnic throw
Another patchwork route leans harder into leftovers: strip-pieced rows, wonky squares, or a “string quilt” look on a muslin base. The picnic context frees you from perfect points. Stabilize lightweight scraps with a firmer backing so forks and knees do not stretch seams open.
Pre-wash everything that might bleed. Picnic blankets meet watermelon, wine, and sunscreen. A dark or busy print on the back hides stains between washes. Finish with a wide binding you can grab when shaking debris off at the car.
6. Geometric picnic blanket
Geometry photographs well on grass: triangles, chevrons, or large color blocks. Cut shapes with a rotary cutter and acrylic ruler for clean edges. Sew systematically—rows of triangles into diamonds, or bold rectangles into a modern grid—then press thoroughly before attaching the waterproof layer.
Limit the palette to three or four colors so the blanket reads designed rather than chaotic. High-contrast binding acts like a frame. If you are new to angles, start with oversized half-square triangles; small precision piecing is harder to appreciate from standing height at a picnic.
7. Upcycled vintage tablecloth picnic blanket
A thrifted tablecloth already has the right scale and often a cheerful print. Inspect for stains and weak spots; cut away damage or place it toward a corner. Back the cloth with oilcloth, clear vinyl, or laminated cotton, then bind or topstitch the edges. The vintage face stays soft for sitting; the modern back handles damp ground.
If the tablecloth is thin, add a light flannel interlayer for comfort. Avoid ironing plastic-backed layers on high heat. This project is one of the fastest paths to a unique blanket because the print work is already done—you are mainly adding durability and a clean finish.
8. No-sew or low-sew picnic mat
Not every picnic blanket needs a full sewing studio. Some designs fuse a fabric top to a waterproof backing with iron-on adhesive designed for laminates, then finish edges with fabric tape or a simple whipstitch. Others clip a purchased outdoor tablecloth to a fleece throw with grommets and carabiners for a temporary kit.
Test adhesives on scraps; picnic heat and folding stress weak bonds. Low-sew versions are ideal for renters, beginners, or last-weekend-before-the-holiday urgency. They may not last a decade, but they can last a season of parks and rooftops if you shake them out and store them dry.
9. Date-night sized picnic blanket
A romantic picnic rarely needs banquet scale. Cut a smaller square or rectangle—think generous for two with a bottle and two plates—in soft fabrics with a discreet waterproof back. Add envelope-style pockets along one edge for napkins or a slim book, and consider a coordinating fabric napkin set from leftover scraps.
Choose colors you will still like in photographs. Deep greens, soft stripes, and muted florals age better than ultra-trendy novelty prints. Pack the blanket with a simple strap so the evening feels intentional rather than improvised with a bedspread you will regret grass-staining.
Fabric, care, and packing tips
Useful materials across these projects: cotton or canvas tops, oilcloth or laminated backs, bias binding, webbing straps, and polyester thread. Pre-wash natural fibers. Store blankets fully dry; roll rather than sharp-fold plastic-backed layers when you can. Spot-clean food messes quickly, then wash on gentle settings that respect any laminate.
Measure your usual picnic crew before you cut. Two people need less blanket than a family plus a cooler. A well-sized DIY picnic blanket becomes the thing you throw in the trunk in May and still use in September—proof that outdoor dining is less about perfect weather than about being ready when the afternoon turns golden.

Comments
Continue reading
Summer DIY: String Bowls, Macramé, Paper Gifts, and Jewelry
Porch-friendly summer crafts—string bowls, beaded and macramé jewelry, paper baskets, hairpieces, and photo collages—ordered by drying time.
5 DIY Sandbox Ideas for Summer Play
Five inexpensive DIY sandbox builds—framed lumber, tire, seating-edge, deluxe covered, and furniture-style—to keep kids busy outdoors.
Pool Noodle DIY Ideas Kids Actually Use
Turn leftover foam noodles into rockets, counters, bed bumpers, soft swords, and outdoor course markers—with safety notes and a short project checklist.