
DIY Necklace Ideas: Fringe, Pearls, Geometric, and Braids
Make statement necklaces on a budget—beaded fringe, pearl-and-ribbon mixes, geometric collars, motifs, and braided ropes—with fit, finishes, and closures that hold up to real wear.
Accessories multiply faster than budgets. Statement necklaces, pearl strands, and geometric collars look polished on a mannequin and expensive at checkout. Making them at home does not mean settling for clumsy results. With wire, beads, ribbon, and a few closures, you can build pieces that sit at the same visual level as boutique jewelry—especially if you treat measurement, weight, and finishing as seriously as color.
The ideas below expand the classic DIY necklace types that craft blogs circled for years: beaded fringe, pearl-and-ribbon mixes, playful fruit shapes, retailer-inspired collars, geometric metal looks, quilled hearts, chunky braids, braided bead ropes, and clean linear strands. One golden geometric example from this gallery is kept as a visual anchor. The rest is method you can reuse with materials you already own or buy in small quantities.
Kit, fit, and finishing before style
A useful starter kit includes nylon-coated beading wire or flexible cable, crimp beads and a crimping plier, jump rings, lobster clasps or hook clasps, chain for adjusters, flat-nose pliers, round-nose pliers, wire cutters, and a bead board or towel so pieces do not roll away. For ribbon and fabric styles, add sharp scissors, fabric glue or a short machine stitch, and clear nail polish or fray check for cut ribbon ends.
Measure first. Wrap a soft tape around your neck at the height you want the necklace to sit—choker, princess, or longer matinee length—then add length for the clasp and any fringe that hangs below the base strand. Heavy fringe needs a stronger base wire or doubled cable; soft ribbon collars can use a hidden ribbon stay so the bow does not stretch out of shape.
Weight distribution decides comfort. Dense glass beads at the front will rotate a light chain to the back unless you balance the design or use a wider clasp area. Skin chemistry and metal sensitivity matter: if nickel bothers you, prefer coated wire, sterling findings, or plastic/nylon options. Seal painted beads and check that glue is fully cured before the first wear.
Beaded fringe necklaces
Fringe necklaces read as movement. Build a sturdy base—strung beads on cable, a finished chain, or a fabric band—then attach dangling strands of graduated length. Keep the longest fringe at center and shorten toward the shoulders so the silhouette follows the collarbone instead of forming a square curtain.
Use the same bead size family within each fringe strand for rhythm, or deliberately mix one accent bead at the tip of every strand for a repeated “period” at the end of each line. Knot or crimp each fringe securely; a single weak join drops at the worst moment. If you want a softer look, alternate matte and glossy beads so light breaks across the fringe instead of flashing uniformly.
For evening wear, darker palettes and metallic tips photograph well. For day, shorter fringe and lighter materials keep the piece from catching on knitwear. Test sit-down clearance: fringe that looks perfect standing can hook on belt buckles when you lean forward.
Pearl and ribbon combinations
Pearl-and-ribbon necklaces borrow couture logic: soft textile against hard sheen. Classic constructions thread faux or glass pearls onto a ribbon, cluster pearls at a center bow, or alternate short pearl segments with ribbon knots. Lanvin-inspired and similar looks usually rely on proportion—enough pearls to feel intentional, enough ribbon to keep the piece from reading as a rigid strand alone.
Choose ribbon with body (grosgrain, double-face satin) so bows hold shape. Cut ends on a clean angle and seal them. If pearls are heavy, reinforce the ribbon with a second inner ribbon or a length of soft wiring hidden in a fold. Closures can be a ribbon tie (adjustable, romantic) or a hidden lobster clasp sewn to ribbon tabs for security on busy days.
Color strategy is simple: ivory pearls with blush or black ribbon for contrast; colored glass “pearls” with neutral ribbon when you want the beads to lead. Avoid stacking a loud print ribbon with multicolored pearls unless you want deliberate chaos.
Geometric and “inspired by” collars
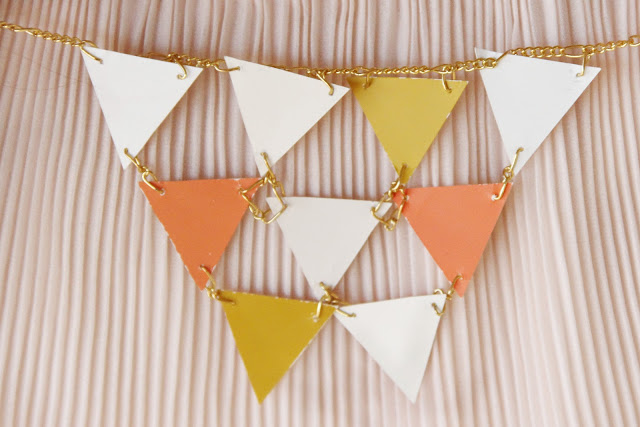
Golden geometric necklaces—like the angular linked piece pictured here—depend on repetition and clean joins. Cut tubing, jump-ring grids, or flat stamped shapes into a repeating module, then connect modules with consistent ring orientation so the collar lies flat. File sharp edges; skin and silk scarves will find every burr.
Retailer-inspired collars (the early-2010s habit of echoing J.Crew and similar lookbooks) usually mean: bold central motif, relatively simple shoulders, and a length that sits above the bust. You do not need the exact catalog beads. You need the silhouette. Sketch the center element first, build outward, and stop when the visual weight matches your neckline rather than when you run out of beads.
If metal modules feel too heavy, mix in acrylic or wood geometrics in the same shapes. Matte finishes hide fingerprints better than ultra-shiny plating on large flat surfaces.
Playful motifs: fruit, hearts, and line drawings in beads
Strawberry and other fruit necklaces work when color blocking is crisp—red or pink bodies, small yellow seed dots or bead “seeds,” green leaf caps—and when scale stays wearable. Oversized foam fruit can look costume-like; mid-size beads or polymer clay keep the joke elegant. Seal polymer clay fully and use sealed jump rings so moisture does not creep into unfinished holes.
Heart motifs from paper quilling need a protective finish (clear coat) and a backing if worn against clothing that pills. Frame a quilled heart in a small bezel or behind clear resin only if you are comfortable with those materials; otherwise treat quilling as a lightweight pendant for occasional wear, not gym-bag jewelry.
Line necklaces—sparse horizontal or gently curved strands with intentional gaps—echo Anthropologie-style airy designs. Negative space is part of the design. Use identical spacers or bare cable sections deliberately, and keep the clasp visually quiet so the line stays the subject.
Chunky braids and braided bead ropes
Chunky braid necklaces use fabric tubes, soft rope, or jersey strips braided into a thick plait, then finished with ribbon wraps or metal ends. Stuff tubes lightly if you want rounder arms of the braid. Secure ends before braiding so strands do not creep unevenly. These pieces shine over simple tees and crewnecks; busy prints compete with the braid’s texture.
Braided bead necklaces weave multiple beaded strands into one rope. Pre-string each strand to equal length, tape the ends to a board, and braid slowly so beads do not stack into lumps. A single accent color running through one strand of the braid creates a spiral without extra charms. Finish with a strong clasp rated for the total weight; braided bead ropes are denser than they look.
Closures, adjusters, and care
- Clasp: lobster clasps for security; hooks for soft ribbon looks; toggles when you can see and operate them easily.
- Extender chain: two inches of chain at the back saves remaking a necklace that sits slightly short.
- Jump rings: soldered or double rings at stress points; single open rings work for light charms only.
- Storage: hang or lay flat; fringe tangles in piles; geometric metal scratches against other jewelry.
- Cleaning: soft cloth for metal and pearls; spot-clean ribbon; never soak glued assemblies.
A practical build order
Start with a line necklace or simple pearl-ribbon piece to learn crimping and finishing. Move to fringe once your joins are reliable. Attempt geometric collars when you are patient with symmetry. Save dense braided bead ropes for a weekend when you can pause without rushing the braid.
Budget control is mostly restraint: buy findings in mixed sizes once, reuse leftover beads across projects, and redesign a failed strand into earrings or a bracelet instead of discarding it. The goal is a small rotation of necklaces you actually wear—not a drawer of almost-finished wire.
Which silhouette would earn a place on tomorrow’s outfit: short fringe over a round neck, a ribbon-and-pearl bow with a blouse, or a geometric collar over a plain knit? Cut and string that one first, finish the clasp properly, and wear it before starting the next idea on the list.

Comments
Continue reading
Simple, Cute Valentine Gift Wrapping Ideas
A craft guide to personalized Valentine wraps—kraft bases, paper hearts, ribbon, tags, and texture mixes—using inexpensive supplies and the gallery examples as patterns.
DIY Spring and Easter Napkin Rings for the Holiday Table
Make Easter and spring napkin rings—nest, knit flower, bunny, scrap-flower, and edible styles—with sizing, food-safety, and batch tips for a calm tablescape.
20 DIY Shoe Makeover Ideas: Paint, Glitter, Clips, and More
Twenty shoe upgrades—floral boots, glitter wedges, neon soles, crystal pumps, lace overlays, and novelty heels—with practical steps for each.